Wait Lists can be used to approve existing and new student registrations, as well as program requests once a room is full. The Program Wait List can be exported to Excel by clicking Actions, then select Export to Excel.
To access the Wait List, follow the instructions below:
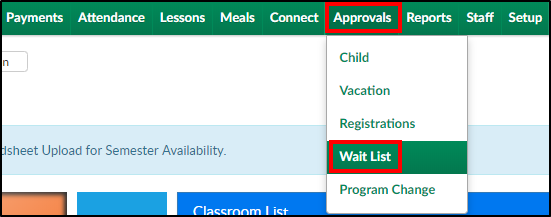
- Click Approvals from the menu bar, then select Wait List
- Use the Search Criteria drop-down to filter results. The Program Wait List will automatically list all pending requests
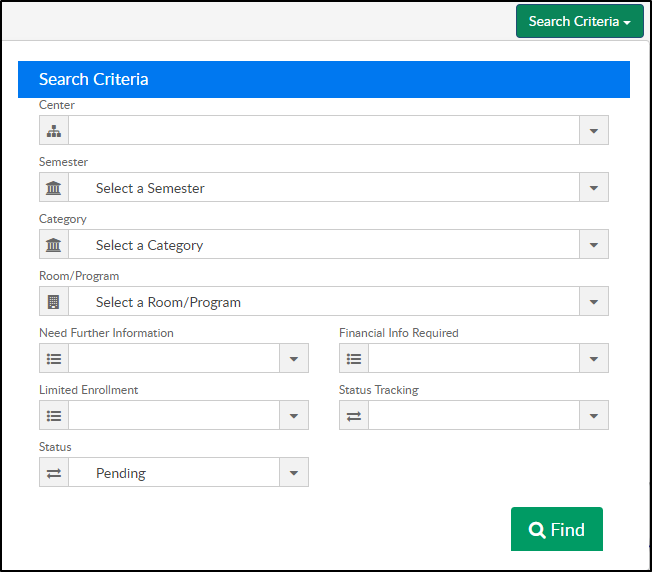
- Center - select from the drop-down to view wait list registrations for a specific center
- Semester - select from the drop-down to view wait list registrations for a specific semester
- Category - select from the drop-down to view wait list registrations for a specific category
- Room/Program - select from the drop-down to view wait list registrations for a specific room/program
- Need Further Information
- Financial Info Required
- Limited Enrollment
- Status Tracking
- Status - choose a status from the drop-down; Pending, Approved, or Rejected
- Click Find to populate the search results

- Registration Date column - the date and time the registration was completed

- Program column - this column includes the program name, semester, selected day(s), and start date

- Enrolled/Capacity - the first number is the current number of students enrolled in the program. The second number is the program capacity. Please Note: if the capacity is unlimited, it will show zero under capacity

- Center - this will show the center that was selected during registration

- Student - the status and student's name will appear under this column

- Family Balance - if the family has an outstanding balance, the amount will show in this column

- Action - this column allows the wait list registration to be Approved or Rejected

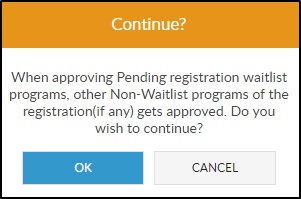
- Approve - this option creates the family account and approve the student's wait list entry and any non-wait list rooms, if any
- After clicking Approve, the following confirmation message will appear. Click OK to continue or Cancel to stop the approval
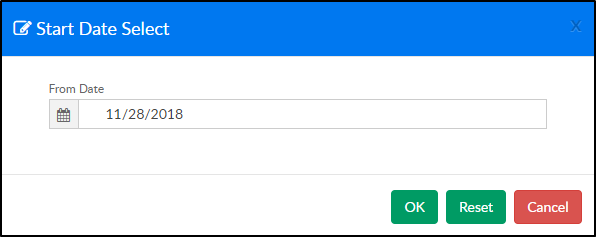
- After clicking OK, select the start date from the next popup
- After clicking Approve, the following confirmation message will appear. Click OK to continue or Cancel to stop the approval
- Reject - this option will only reject the selected wait list room. The family's account will stay in the Approval Registration screen. Once Reject is selected, the following confirmation window will appear. Click OK to confirm the rejection or click CANCEL to stop the rejection

- Approve - this option creates the family account and approve the student's wait list entry and any non-wait list rooms, if any


