The Extended configuration screen allows a site to set generic settings. This will be the first place to visit upon first login.
Navigate to the Extended screen by clicking Setup, then select System Config. Once the Extended tile is selected, the below options will display:
**Connect Portal - Connect Portal settings have been moved to System Config > Connect Portal
Search Features - The Search Features section displays items related to searching for families across multiple centers.
- Allow Deposit Payer Search Across Center
- Yes - allow administrators to post payments from a payer across multiple centers
- No - do not allow payments from a payer across multiple centers
- Allow Parent Email Search Across Centers
- Yes - allow administrators to send email to guardians across multiple centers
- No - do not allow emails to be send across multiple centers
- Online/POS Payment Search Results Mode
- Compact scrollable view - only view the search results in a scrollable table
- Let the user choose - (Recommended) - administrator has the ability to select which criteria will be displayed when searching for transactions
- Full-page view (HTML) - only display the search results in the HTML format
- Allow Attendance Search by Rate Category (default option) - this allows the Include Students With Same Rate Category option on the Attendance > Entry screen. If rate categories are not setup, this option will not display
- Yes - the Include Students With Same Rate Category option will be checked automatically when clicking on the Search Criteria button
- No - the Include Students With Same Rate Category option will be unchecked when clicking on the Search Criteria button
- Do not display option - removes the Include Students With Same Rate Category option from the Search Criteria window
Reports - This section allows users to enter specific details used by reports to generate results.
- Age Cutoff Date (Used by Age and Income Analysis Report) - enter the age in date format for cutoff
PIN - The PIN section displays the auto-generation pin settings for individuals within the system.
- Auto Create PIN
- Yes - a PIN will automatically be created for each guardian as they are created within the system. This PIN is used to clock in and out using the InSite application
- No - administrators must manually assign a PIN for each guardian
- Auto Create Contact PIN
- Yes - a PIN will automatically be created for each contact as they are created within the system. This PIN is used to clock in and out of the InSite application
- No - administrators must manually assign a PIN for each contact
Security
- Parent Portal: Auto expire login password - Enter the number of days a password should expire after. By default, passwords will expire every 180 days
- Provider: Auto expire login password
- Yes - the password will expire after the set number of days entered below
- No - passwords will not auto-expire
- Provider: Password expiration frequency (in days): Please Note: this option will only appear if Yes is selected above
- Enter the number of days a password should expire for the admin site
Billing - The Billing section displays settings for running billing within the system.
- Allow Family Recreate
- Yes - allow administrators the ability to recreate a family's financial ledger. Recreating will recalculate billing for the family; taking into account any updates to the student's program room assignments, attendance, or discounts. Please Note: The Recreate option is only for Defined Billing Periods.
- No - do not allow administrators to recreate a family's ledger
- # of Days Before Family Inactive - enter the number of days a family's account will remain active without any classroom assignments for student(s) before the system automatically marks the family as inactive
- # of Reservations Weeks Per Year - determines the number of weeks a parent is able to have a reservation fee. Reservation fees are charged to families if the student is scheduled to attend, but does not attend. Please Note: This process requires additional setup for the Reservation Weeks process
- Allow Same Week Vacation
- Yes -
- No -
- Apply Event Fee on Manual Assignment (This does not impact registration done via the Parent Portal)
- Yes - have the system automatically apply a registration fee for any events added to students on the administrator side
- No - when an administrator enrolls a student into an event, it will not charge the student the registration fee automatically
- Set Flat Rate Effective Date to First of Month
- Yes - the system will calculate the monthly rate for the center based on the first of the month. Please Note: This is only used for centers that use flat rates, which charge a family one amount for length of the billing period
- No - do not have the system calculate the monthly rate
Labor/Payroll - The Labor/Payroll section displays the settings for a center's labor and payroll processes.
- Allow Editing Past Payroll Periods
- Yes - administrators are able to edit staff attendance after a payroll period is closed
- No - administrators are not allowed to edit staff attendance after a payroll period is closed
- Allow Editing Prior to Current Date?
- Yes - administrators are able to add/edit check in/out times for staff members any day
- No - administrators can only edit/add check in/out times for staff members on the current day, not a day in the past
- Using Labor Scheduling?
- Yes
- No
- Use Rounded Hours for Attendance?
- Yes
- No
- Track Labor by Attendance Center?
- Yes
- No
- Use Actual Hours (hours and minutes, not fractional)?
- Yes - actual hours will display as 2:45 for 2 hours and 45 minutes
- No - fractional hours will display as 2.75 for 2 hours and 45 minutes
- Labor Interval (Minutes) - enter the interval used for staff labor scheduling and labor planning. This interval displays on the Staff > Create Schedule screen
- Number of Time Periods to Display - enter the number of periods to display on the Staff > Create Schedule screen
- Number of Hours Before and After Center Hours to Display - enter the number of hours to display before or after center hours that are setup on the Home > Hours tab
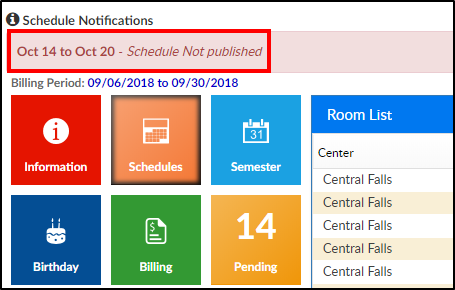
- Schedule Not Published Notification - enter custom text that displays when a schedule is not yet published. This notification will display on the Home screen under Schedule Notifications
- Schedule In Progress Notification - enter custom text that displays when a schedule is in the process if being created. This notification will display on the Home screen under Schedule Notifications
- Schedule Published Notification - enter custom text that displays when a schedule is published. This notification will display on the Home screen under Schedule Notifications
- Inactive Staff With Published Schedule Notification - enter custom text that displays when an inactive staff member has a published schedule. This notification will display on the Home screen under Schedule Notifications
- Create Schedule Description - enter custom text to display on the Staff > Create Schedule screen under the Schedule section

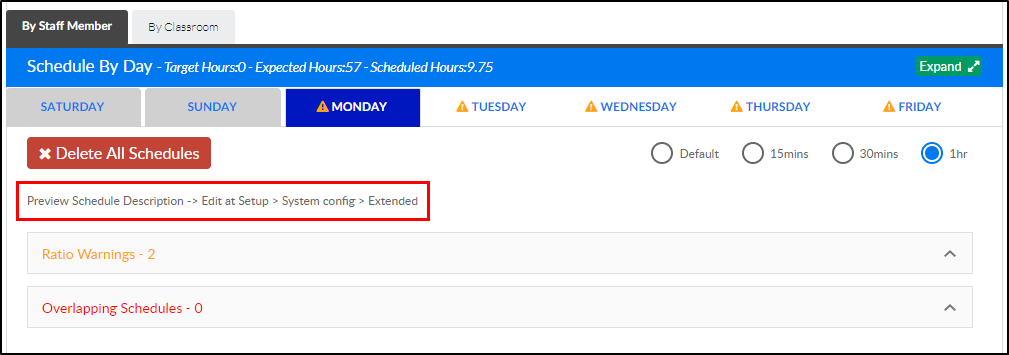
- Preview Schedule Description - enter a custom text to display on the Staff > Preview Schedule screen


Statements/Financials - The Statements/Financials section displays the settings for a center's billing statements and financials.
- Allocation Screen Page Size - enter the total number of allocations that will appear on the allocation screen
- Allow Agency Refund
- Yes - the third party agency is able to have a payment refunded
- No - the third party agencies do now allow for payments to be refunded
- Allow Holding Accounts
- Yes - a holding account can be created for a third party agency
- No - a holding account cannot be created for a third party agency
- GL Account Separator
- No Separator - do not use a separator between each General Ledger string
- Dash (-) - use a dash to separate each individual General Ledger string
- Period (.) - use a period to separate each individual General Ledger string
- Payment Allocation Method - determines how the system will automatically allocate payments to charges on the family's financial ledger
- First In - allocate payments first to the oldest charge
- Last In - allocate payments first to the newest charge
- Allow Statement Split Save Override
- Yes - administrators are able to edit the split fee details and override the original cost. Please Note: This override will be removed if the family's financial ledger is recreated
- No - administrators are able to edit the split fee details, but not able to override the original fee
- Allow Split Parent Due Less Than Copay Amount
- Yes
- No
- Save Prior Period Split Adjustment in Current Period
- Yes
- No
- Display Aging for Outstanding Payments Report
- Yes - display an aging balance on the Outstanding Payments report
- No - do not display an aging balance
- Allocate by Center
- Yes - the system will only look for fees with rooms or children at the same center, or where there is no room ID or child ID associated to the fee
- No (Default) - when looking for fees to allocate a payment to, the system will look for rooms at any center
- Financial Reports - Process Revenue By
- Family Center
- Room/Program Center
- Semi-Room/Program Center
- Financial Reports - Process Payments By
- Family Center
- Room/Program Center
- Semi-Room/Program Center
- Financial Reports - Retrieve Data by Post Date
- Yes
- No
- Print Statements by
- Family - print statements based off of family
- Guardian - print statements based off of guardian
- Match Coupon Redemption Code to Coupon Code
- Yes - require a coupon code be entered when adding a coupon on the family's financial screen
- No - no coupon redemption code is required
Attendance/Schedule - The Attendance/Schedule section displays settings regarding recording attendance and scheduling children within the system.
- Use Attendance Journaling
- Yes - view attendance journal when recording attendance. Please Note: This is only used in conjunction with the DCW InSite attendance application
- No - do not view attendance journal when recording attendance
- Use Face-to-Name Tracking
- Yes - create a face-to-name record for a student. Please Note: This is used in addition to an attendance record for a student and only works in conjunction with the DCW InSite attendance application
- No - do not create a face-to-name record
- Only Display Rooms Active or Pending Semester
- Yes - when an administrator adds a classroom assignment for a student, the Room drop-down list will only display classrooms with an association to a current or future semester
- No - show all rooms
- Only Allow End Date Changes to Schedules
- Yes - if an administrator attempts to edit a previously created classroom assignment for a student, they will only be able to enter the end date
- No
- Allow Schedule Change Request Approval by Date
- Yes
- No
- Require Third Party Contract Attached to Assignment
- Yes
- No
- Send email to parents when wait list is saved on PRA screen
- Yes - an email will be sent to parents when the wait list room is saved on the Program/Room Assignment screen
- No - parents will not receive an email when wait list room is saved on the Program/Room Assignment screen
- On attendance check-in do auto move (InSite Check-In)
- Yes
- No
- Agency Attendance Integration - Child Authorization # to use
- Use Third Party Contract > "Child Contract ID #"
- Use Child Screen > "Accounting ID"
- Auto Pick Room for Select Check In/Out By Time
- Yes - Recommended when using Parent Managed Calendars and unscheduled attendance fee. Click here to review the check in logic
- No - Recommended when not using Parent Managed Calendars
Family- Updates the view of the family tab, enables batch enroll options.
- Batch Enroll - Allow Mass Enroll for Events Only
- Yes
- No
Integration - The Integration section displays the settings for integration with the system and an outside third party software program.
- Auto Create From SIS
- Yes - have the system automatically create students from a school's SIS feed if they do not already have an account within the system. Please Note: This section requires an SIS integration within the system
- No - do not have the system automatically create students from a school's SIS
- Unity Report Time
- Local Time Zone
- Eastern Time Zone
Registration- allows you to select when emails will be sent to parents.
- Send Email to Parent (New Registration)
- On Confirmation Only
- On Approval Only
- On Confirmation and Approval
- Do Not Send
End of Day
EOD Closed Redirect to Page URL -
Setup
Room Summary Attendance Group Text
Default Prepay Allocations
- Apply As
- Payment
- Adjustment
- Type of Payment -