Reoccurring Billing Classrooms are rooms or programs that have a weekly or monthly reoccurring billing cycle.
Classrooms in the system are the names of programs, but do not need to be actual, physical locations. Using the Physical Room Name text box, administrators can combine multiple online classrooms into one physical location. If selections at the category level are setup but there are changes entered at the classroom level, the system will default to the selections made at the classroom level.
Creating a Reoccurring Billing Classroom
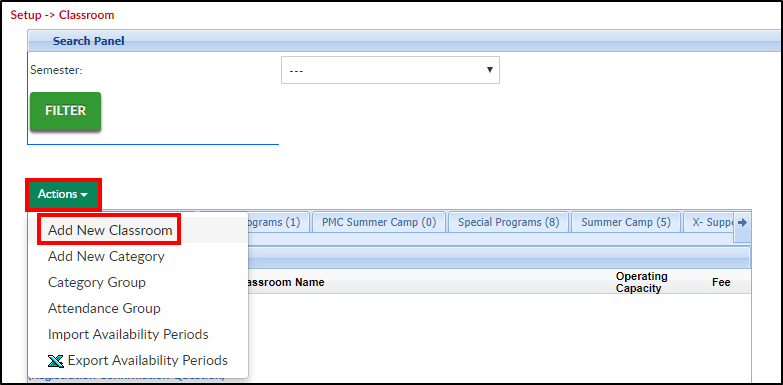
- Click Setup, then select Classroom

- Click Actions, then select Add New Classroom

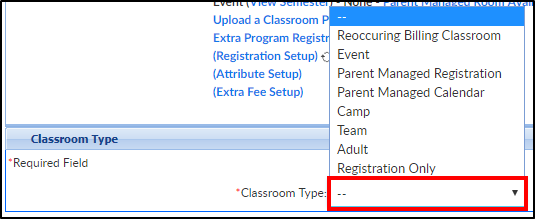
- Scroll to the bottom of the page and click the Classroom Type drop-down menu

- Select Reoccurring Billing Classroom
- Classroom Information - complete the required and any necessary information in this section
- *Classroom Name - enter the name of the program being setup (this can be changed in the future)
- Classroom Category - choose a category from the drop-down. Selecting a category will allow administrators to pull detail by category and this will impact where the program displays for parents during registration
- Attendance Group - choose from the drop-down. Attendance groups allow centers to combine multiple classrooms together for labor and planning and staff scheduling
- Online Description - enter any information to display during registration. This information can include program details, rates, images, etc.
- *Operating Capacity - enter the maximum number of students allowed to register into this room. This can also be important for some capacity reports. Please Note: entering 0 will allow unlimited registration
- Licensed Capacity - enter the maximum number of the students the room is licensed for
- Send Email When Room Reaches Operating Capacity
- Yes - an email will be sent to the designated contact (Contact Email field) when the room reaches capacity
- No - an email will not be sent when capacity is met
- *Registration Fee - enter the cost to register into the program. Please Note: this amount will only apply if the Semester Cost At is set to Room/Program or Semester Family & Room/Program
- Active
- Yes - registration will be enabled for this room
- No - registration will not be enabled for this room
- Pending
- Show In Mobile Apps
- Yes
- No
- Primary Classroom
- Yes - this room will be a primary room for a student's third party contract
- No - this room will not be a primary room for a student's third party contract
- Physical Room Name - if the classroom has a physical room name, enter here
- Default Revenue Type
- Deferred Revenue Type
- Allow Discounts
- Yes - discounts can be applied to the classroom
- No - the classroom is not eligible for discounts
- Tuition Based Program - this option will designate the classroom as tuition based and allow the room to be eligible for tuition based discounts
- Yes - On Schedule - this classroom's tuition is based on the student's schedule
- Yes - On Attended Day - this classroom's tuition is based on attendance
- No - this classroom is not tuition based
- Student/Teacher Ratio - enter the desired student to teacher ratio for the classroom
- Required Student/Teacher Ratio - enter the required ratio of student to teacher for the classroom
- Invoice Hourly Immediately (Suggestion: leave as default)
- Yes - immediately invoice parents for the hours the student attends. Please Note: additional billing code is required
- No (Default) - amount will be billed during regular billing process
- Tax Credit Eligible (Suggestion: leave as default)
- Yes - parents are eligible for a tax credit for enrolling their student into the classroom. Please Note: additional billing code is required
- No (Default) - parents are not eligible for a tax credit for enrolling their student into the classroom
- FTE Eligible (Full Time Equivalency)
- Yes - the center is recording FTEs and the classroom is eligible for FTE calculation
- No - the center is not tracking FTE detail
- Accounting Code - enter the accounting code or identification number used to reference the classroom in the GL Builder
- Include on Year End Tax
- Yes - the classroom should be displayed on a family's year-end tax statement
- No - the classroom should not display on a family's year-end tax statement
- Age Range (In Months) - enter the age of students who can register into the classroom. Please Note: this is based off the student's current age, not age at registration or program start
- Age Deadline Date - if students must be a certain age by a specific date, select the date from the drop-down calendar
- Square Footage - enter the square footage of the physical classroom
- Sequence # - enter the sequence number to determine what order the classroom should display on the registration page of the parent portal
- # Hours Max for Half Day FTE
- Daily Sheet - if Daily InSites will be provided to parents, select the Daily Sheet template that should be used
- Facility - this is a retired field
- Allow Room Change Request
- Yes - parents will be able to submit a Room Change Request on the parent portal under the attendance/schedule tab
- No - parents will not be able to submit a Room Change Request
- Allow Schedule Cancel Request
- Yes - parents will be able to submit a Schedule Cancel Request on the parent portal
- No - parents will not be able to submit a Schedule Cancel Request
- Show Only on Staff Scheduling
- Yes - the room is only being used to scheduled staff and will not count towards FTE/registration
- No - the room is a regular room being used for students
- CACFP - complete this section if meals will be served
- Room Meal Times - click Edit Meal Times to add/edit times meals will be served
- Attendance Information - complete the necessary information
- Collect Attendance
- Yes - allow attendance to be recorded for the classroom
- No - do not allow attendance to be recorded for the classroom
- Split Attendance (Suggestion: leave as default)
- Yes - attendance in the classroom will be split between two classrooms. Please Note: this s only used for double subsidy recording and requires additional billing code
- No (Default) - this site has not been setup for split attendance working with subsidies
- Default Attendance In/Out
- No - no default attendance method selected for the classroom
- Room Defaults - the default attendance method selected as the Default Check In and Default Check Out times. Please Note: if Room Default was selected, enter the default check in/out times, this is based off a 24-hour clock
- Schedule Defaults - attendance defaults to the student's expected arrival and departure times for the classroom
- Center Hours Default - attendance defaults to the hours the center is open
- Default Check In - if Default Attendance is set to Room Defaults (above), enter the check in time
- Default Check Out - if Default Attendance is set to Room Defaults (above), enter the check out time
- Unscheduled Attendance Fee - enter the amount charged for each occurrence of an unscheduled attendance
- Unscheduled Revenue Type - if there is a Type - Fee Valid Valid that will be associated to the unscheduled attendance in the classroom, select from the drop-down
- Collect Attendance
- Additional Online Registration Information - complete the necessary information in this section
- Registration Type - select Event. Reminder, only used if the classroom is charged a one-time fee
- Send Admin Email on All Registrations
- Use Default
- Yes - an email will be sent for every registration into the classroom
- No - an email will not be sent when students register into the classroom
- Finishing Text - enter the message that will display to the parents after completing registration
- Place into Waiting List
- Yes - all students will be placed into a waiting list during registration and will all require approval
- No - portal registrations from existing families will automatically be approved
- Add to Waiting List After Reaching Operating Capacity
- Yes - once capacity is reached, the Enroll button will change to Add to Wait List
- No - once capacity is reached, the room will no longer accept registrations
- Allow - from the drop-down list, select the time the classroom will be available
- Number of Credits - if applicable, enter the number of credits earned upon completion of the program
- Pay First before accepting registration
- Yes - parents will be required to pay the classroom registration fee before completing registration, unless a check unlock code is provided
- No - parents will be able to complete registration without paying, the fee will be allocated to the family's financial record
- Full Registration (Online)
- Yes - registration for the classroom will display for new and existing families
- Connect Portal Only - registration will only display for existing families registering via the Connect Portal (parent portal)
- Registration Online
- Open - registration is open for students to register
- Closed - do not open registration for this classroom
- Registration View - ensure this option is set to Wizard
- Allow Registration Rate Selection
- Yes - allows parents to select a rate from a category of rates. Rate Categories must be setup prior
- No - students will be assigned the default rate
- Allow Registration Across Centers
- Yes - all families will be able to register, including families from another location, if applicable
- No - only families at the classroom's location are able to register
- Allow Initial Schedule Selection
- Yes - during registration, parents are able to select which days their student will attend
- No - during registration, parents will not be able to select the days their student will attend
- Allow Initial Start Date
- Yes - parents will be able to select a requested start date for the student's program/room assignment. The start date will be based off the semester settings found under View Semester or the default settings in Setup > Semester
- No - parents will not be able to select a start date for the student's program/room assignment
- Minimum Days Selected - if parents are selecting Allow Initial Schedule, enter the minimum number of days they can select
- Maximum Days Selected - if parents are selecting Allow Initial Schedule, enter the maximum number of days they can select
- Start Hour - enter the program start time using a 24-hour clock
- Stop Hour - enter the program end time using a 24-hour clock
- Billing Period - only use this option if billing is Transactional
- Daily
- Weekly
- Monthly
- Yearly
- Custom
- None - see below
- If "None" Billing Period (Use Default if all days selected - Leave as default setting: No
- # Months Upfront - if a site wants to pre-bill for the default rate, enter the number of periods up front. Examples:
- If a rate is set to $20.00 per week and 1 is entered in this field, the parent would need to pay $20.00 up front to register
- If a rate is set to a flat $300.00 and 2 is entered in this field, the parent would have to pay $600.00 before completing registration
- Default Rate - select the default rate amount that will be charged. Default rates can be setup in Setup > Rates
- Default Days - place a check-mark under the days for the program schedule
- Display Course
- Yes - display the course number on registration
- No - do not display the course number on registration
- Display Age Range
- Yes - display the age range on registration
- No - hide the age range on registration
- Display Min Enrollment
- Yes - display the minimum student enrollment on registration
- No - hide the minimum student enrollment on registration
- Display Max Enrollment
- Yes - display the maximum student enrollment on registration
- No - do not display the maximum student enrollment on registration
- Display Current Enrollment
- Yes - display current number of students enrolled on registration
- No - hide current enrollment on registration
- Display Program Dates
- Yes - display the program start and end dates during registration
- No - do not display program dates
- Registration Fee Label - If the registration fee field should be labeled differently, enter the new label here
- Registration Button Label - if the registration button field should be labeled differently, enter the new label here
- Display Waiver
- Yes - the waiver entered below will be displayed
- No - the waiver below will not be displayed
- Waiver - enter the waiver text to display
- Fixed Plan for all days
- Yes - the schedule will be the same for all days
- No - use this option if Plan Options will be used
- Determine Sibling Registration Fee by center - Please Note: this applies for Room/Program Setup and Semester Family & Room/Program
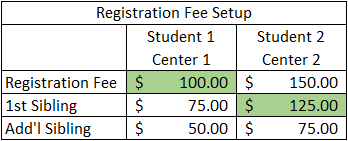
- Yes - all students must pay the first student Registration Fee. See chart below for example; highlighted fees will be charged:

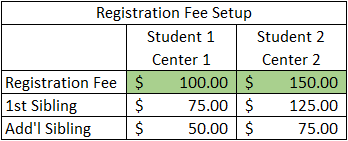
- No - the first student is charged the Registration Fee, the second student is charged the 1st Sibling Fee for their attending center, and additional students are charged the Additional Sibling rate for their attending center. See View Semester for assistance setting up fees. Example: Student 1 attends Pine Elementary PM Latchkey and Student 2 attends Oak Elementary PM Latchkey. Instead of charging both students the Registration Fee, the school/center allows the second student to be charged the Sibling Fee for their attending center. See chart below for an example of a fee setup:

- Yes - all students must pay the first student Registration Fee. See chart below for example; highlighted fees will be charged:
- Taxes - complete this section as needed
- Registration taxable
- Yes - the registration fee is taxable. Click here for tax setup
- No - the registration fee is not taxable
- Tuition Taxable
- Yes - the tuition is taxable
- No - tuition is not taxable
- Registration taxable
- Parent Managed (Portal) section
- Allow Calendar Selection - for Parent Managed Calendar/Registration Rooms only
- Yes - allow parents to choose which days the student will attend from a calendar
- No - parents cannot choose the days from a calendar
- Calendar Cutoff Day - choose the last day parents can select for their student to attend. For example, if Day Prior is selected, parents can select the next day for their student to attend. If Week Prior is selected, parents must choose the days at least one week prior to attending
- Calendar Cutoff Hour - select the hour, if applicable, the calendar selected will be turned off
- Calendar Cutoff Based on Billing Period
- Yes - the calendar cutoff days will be based on the billing period
- No - cutoff days will not be based on the billing period
- Portal View Selection - this option determines how parents will view the calendar in the parent portal
- Bill As -
- Portal Read Only
- Yes - parents cannot choose the days from the portal
- No - parents can choose the days from the portal
- Use 5 Day rate as max amount
- Use AM/PM Rate if applicable
- Combine Operating Capacity with Program - if the program capacity needs to be combine with another program, choose the program in the drop-down menu
- Allow Calendar Selection - for Parent Managed Calendar/Registration Rooms only
- Authorize Facilities section - click Add to add the event to each center
- Click Save
- To authorize sites, click the room name

- Scroll to the bottom of the setup screen under Authorize Facilities
- Click Add next to each center to authorize

- Click Save


