Parent managed classrooms allow parents to register students for a classroom and select the days the student(s) will attend. Administrators select the available days on a calendar, then parents select the days the student(s) will attend.
Prior to creating the Parent Managed Registration and Calendar rooms, there are three settings that must be turned on in the System Config screen. Navigate to Setup > System Config > Registration and ensure the settings below are set to Yes.

Please Note: To view common issues that occur and associated articles in regards to parent managed rooms/calendars, scroll to the bottom of the page.
Creating a Parent Managed Room
Once the above System Config settings are set to Yes, follow the steps below to create the registration room, calendar room, and setup calendar availability.
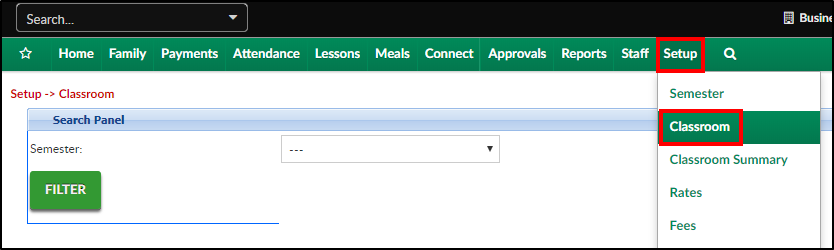
- Click Setup, then select Classroom

- Click Actions, then select Add New Classroom
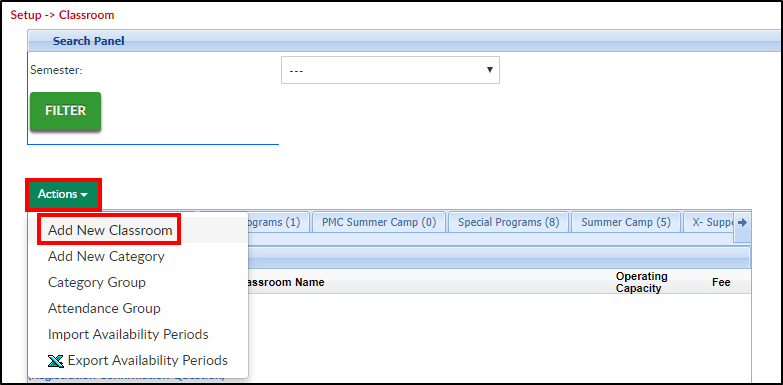
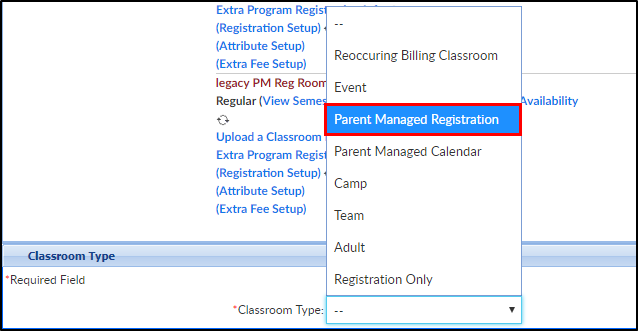
- Scroll to the bottom of the page, click the Classroom Type drop-down menu and select Parent Managed Registration
- The following options are required. Click here for descriptions of all available room configuration options
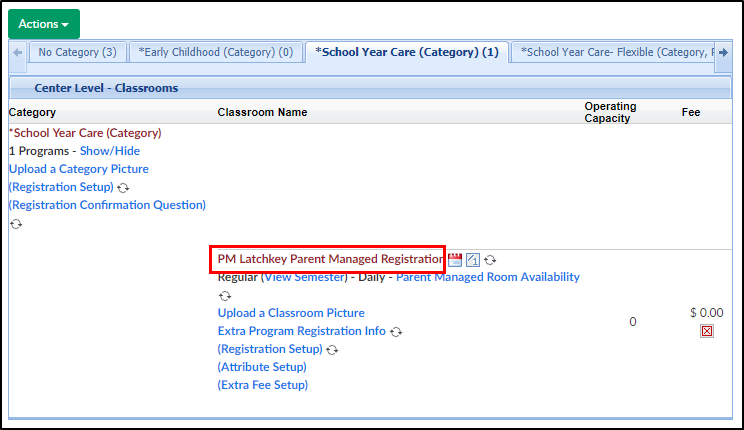
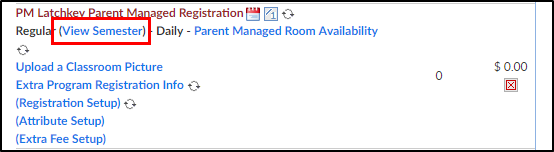
- Room Name - enter the name of the room. Be sure to specify it is the Registration room. For example: PM Latchkey Parent Managed Registration
- Classroom Category - select a category from the drop-down
- Operating Capacity - enter the maximum capacity; a capacity of 0 means unlimited
- Registration Fee - enter the registration fee, if applicable
- Billing Period - select Daily
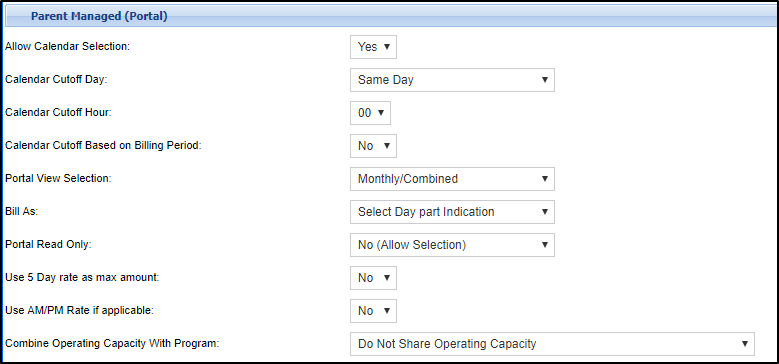
- Allow Calendar Selection - select Yes
- Calendar Cutoff Day - choose the last day parents can select for their student to attend. For example: if Day Prior is selected, parents can select the next day for their student to attend. If Week Prior is selected, parents must choose the days at least one week prior to attending
- Portal View Selection - select Monthly/Combined
- Bill As - choose the correct option from the drop-down
- Portal Read Only - choose No (Allow Selection)
- Use 5 Day rate as max amount - select No
- Use AM/PM Rate if applicable - select No
- Combine Capacity with Program - if the program capacity needs to be combine with another program, choose the program in the drop-down menu
- Click Save
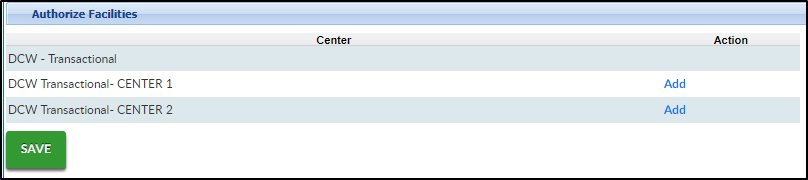
- To authorize site(s), do the following: once the Registration room has been setup/saved, click the room name. Please Note: single centers do not need to do this step
- Scroll to the bottom of the configuration screen and locate the Authorize Facilities section
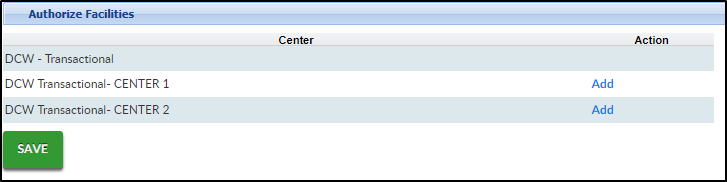
- Click Add to authorize each center as needed
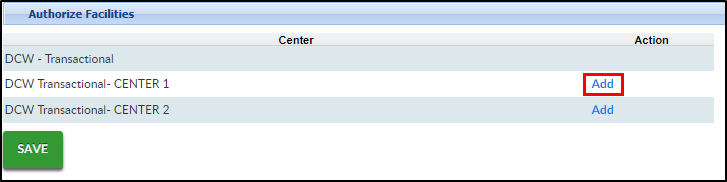
- Click Save
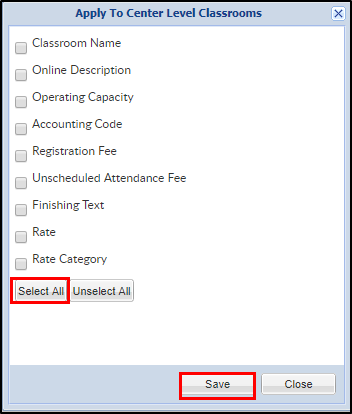
- On the Apply To Center Level Classrooms popup, click Select All to copy all settings to the center level. Please Note: this will override all settings set at the center level
- Locate the Registration room
- Click View Semester
- In the Semester drop-down, choose which semester the registration room should be associated with

- Complete the necessary information in the View Semester screen. The following options are required:
- Enrollment Information section
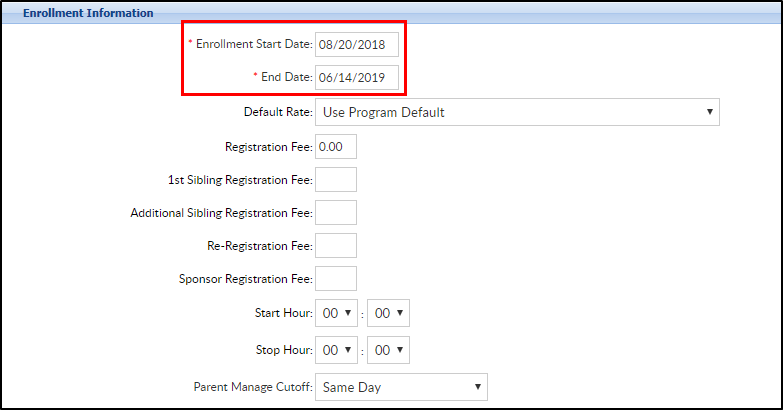
- Enrollment Start Date - enter the start date parents should be able to select
- End date - enter the last date parents should be able to select. For example, if it is a latchkey program for the entire school year, the enrollment date will be the date when parents can start adding days, the end date will be the last day of the school year
- Registration Information section
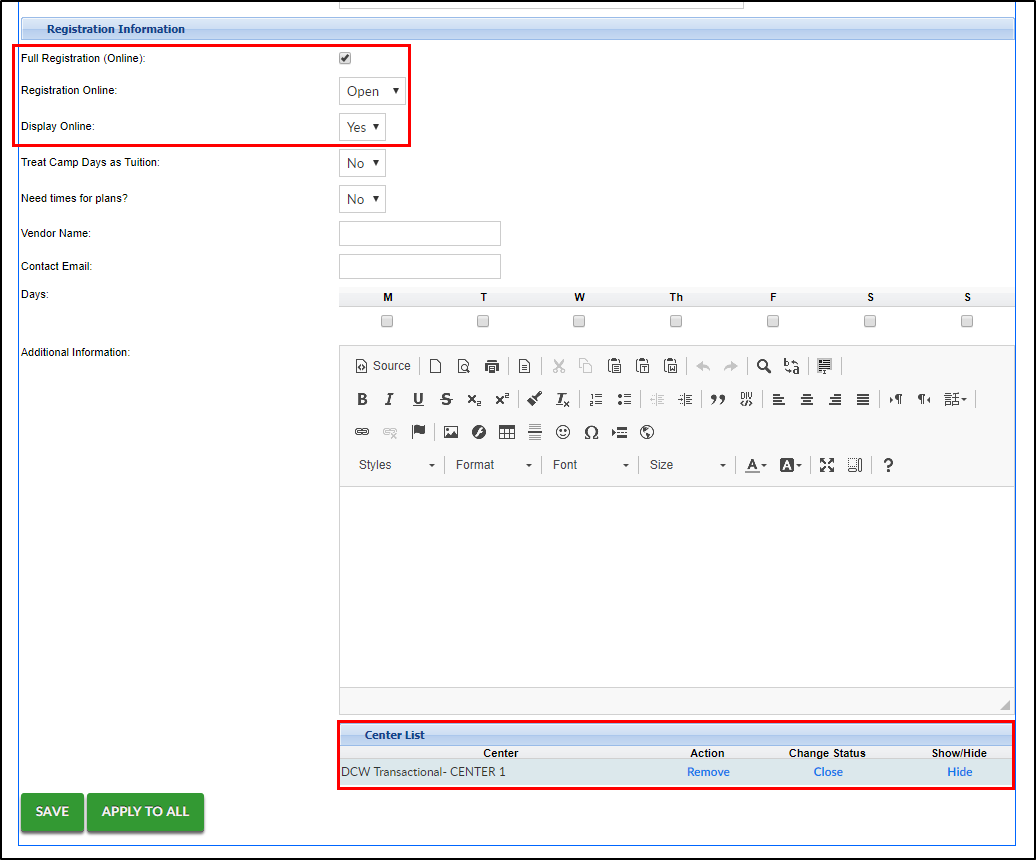
- Full Registration (Online) - check the box
- Registration Online - select Open
- Display Online - select Yes
- Under Center List, at the bottom of the page, click Add next to each center
- Click Apply to All at the bottom of the screen
- Locate the Center List again and ensure the Show/Hide column says Hide
- Enrollment Information section
- Click Save
- Now the Parent Managed Calendar room must be created. Click Setup, then select Classroom
- Click Actions, then select Add New Classroom
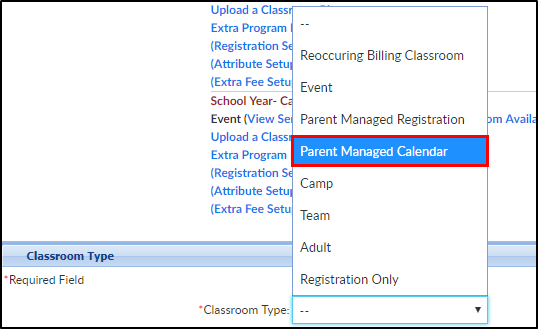
- Scroll to the bottom of the page, click the Classroom Type drop-down menu, and select Parent Managed Calendar
- The following options are required. Click here for a description of all available room configuration options
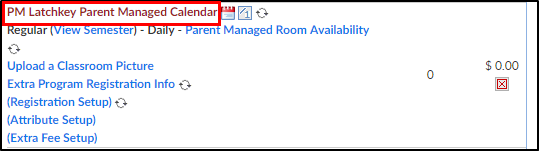
- Room Name - enter the name of the room. Be sure to specify it is the Calendar room. For example: PM Latchkey Parent Managed Calendar
- Classroom Category - select a category from the drop-down
- Operating Capacity - enter the maximum capacity; a capacity of 0 means unlimited
- Registration Fee - enter the registration fee
- Billing Period - select Daily
- Allow Calendar Selection - select Yes
- Calendar Cutoff Day - choose the last day parents can select for their student to attend. For example, if Day Prior is selected, parents can select the next day for their student to attend. If Week Prior is selected, parents must choose the days at least one week prior to attending
- Portal View Selection - select Monthly/Combined
- Bill As - choose the correct option from the drop-down
- Portal Read Only - choose No (Allow Selection)
- Use 5 Day rate as max amount - select No
- Use AM/PM Rate if applicable - select No
- Combine Capacity with Program - if the program capacity needs to be combine with another program, choose the program in the drop-down menu
- Click Save
- Once the calendar room has been saved, click the room name to authorize sites
- Scroll to the bottom of the room configuration screen and locate the Authorized Facilities section
- Click Add under Action column to add the calendar room to each site as needed. When the word "Add" changes to "Remove", the calendar room has been added to the site
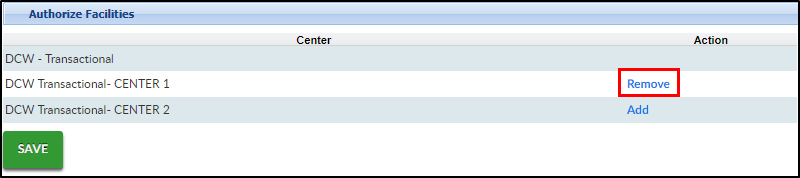
- Click Save
- On the Apply To Center Level Classrooms popup, click Select All to copy all settings to the center level. Please Note: this will override all settings set at the center level
- Locate the calendar room just created and click the View Semester link directly below the room name
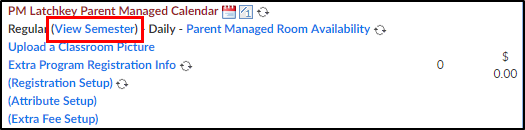
- In the Semester drop-down, choose which semester the calendar room should be associated with. Please Note: this should be the same semester used for the Registration room

- Complete the necessary information on the Semester screen. Below are the required fields, click here to view descriptions for all available options
- Enrollment Information

- Enrollment Start Date - enter the start date parents should be able to select
- End date - enter the last date parents should be able to select. For example, if it is a latchkey program for the entire school year, the enrollment date will be the date when parents can start adding days, the end date will be the last day of the school year
- Registration Information section
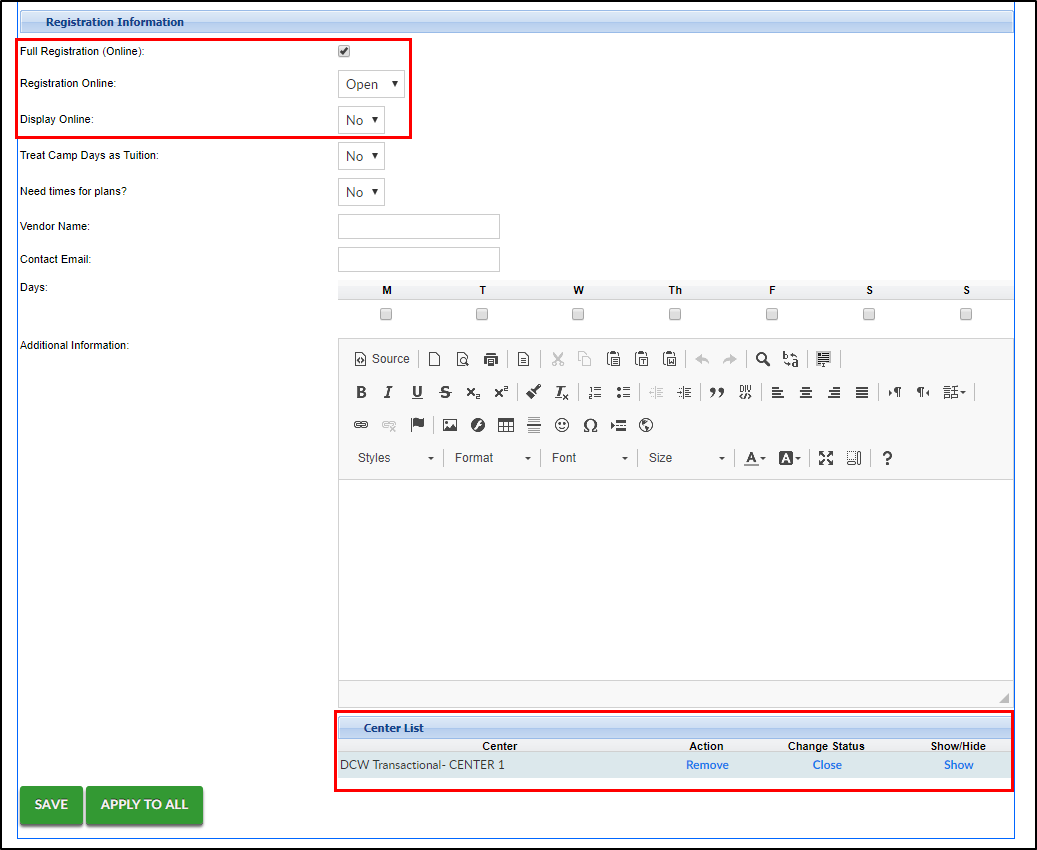
- Full Registration (Online) - check the box
- Registration Online - select Open
- Display Online - select No
- Enrollment Information
- Click Save
- To add the calendar room to the necessary site, scroll to the bottom of the screen to add the site(s). Click Add next to each site as needed

- Click Save
- Scroll to the bottom of the screen again. Under the Center List section, ensure the Show/Hide column says "Show"

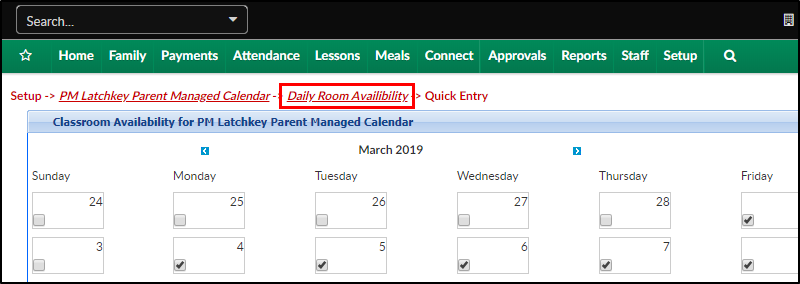
- To add days to the calendar room, click Setup, then select Classroom
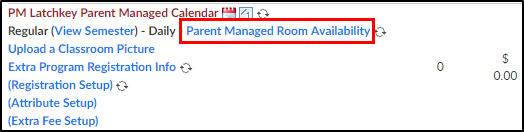
- Locate the Calendar room just created, and click the Parent Managed Room Availability link
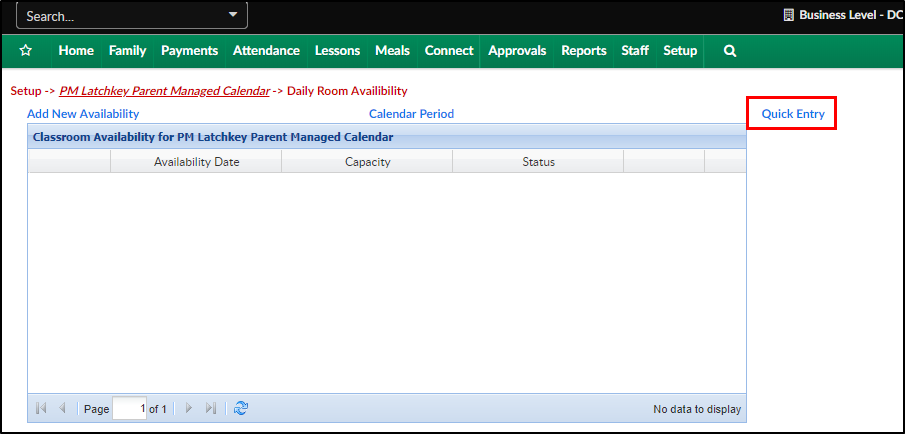
- Select Quick Entry
- Place a check mark under each day the room will be available. By doing this, parents can select that day from the parent portal
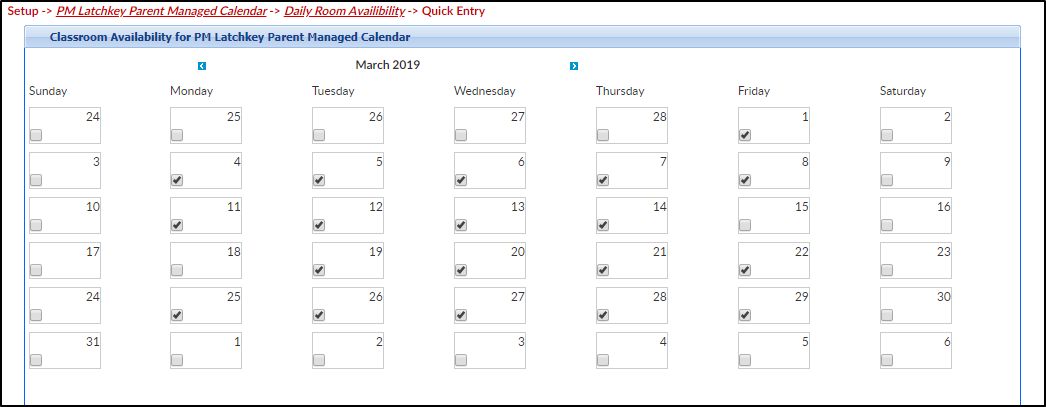
- Complete the New Classroom Availability for <Calendar Room Name> section
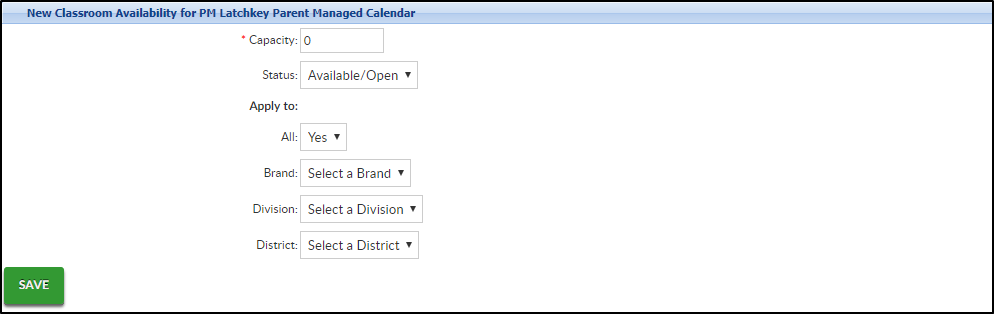
- Capacity - enter the number of students that can register each day. Please Note: a capacity of 0 is an unlimited capacity
- Status - select Available/Open for parents to be able to select the day
- Apply to All - select Yes
- Click Save
- Navigate to the overall availability to ensure the days were successfully added. To do this, click Daily Room Availability above the calendar
- Each day previously selected from the calendar, will display individually in the Classroom Availability section
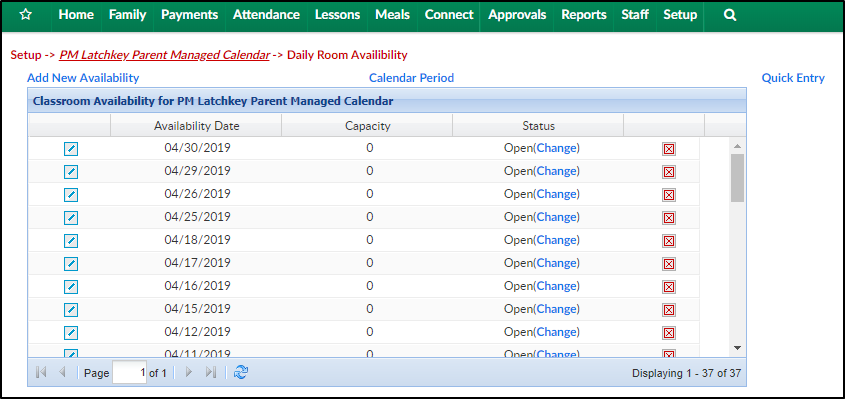
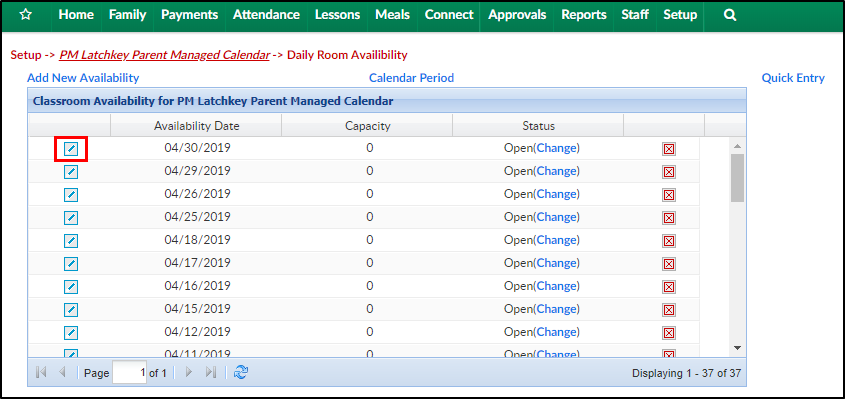
- To edit the information for a specific day, click the modify icon in the first column
- To change the status to Closed, click the Change link in the Status column

- To delete a day, click the red X in the far left column
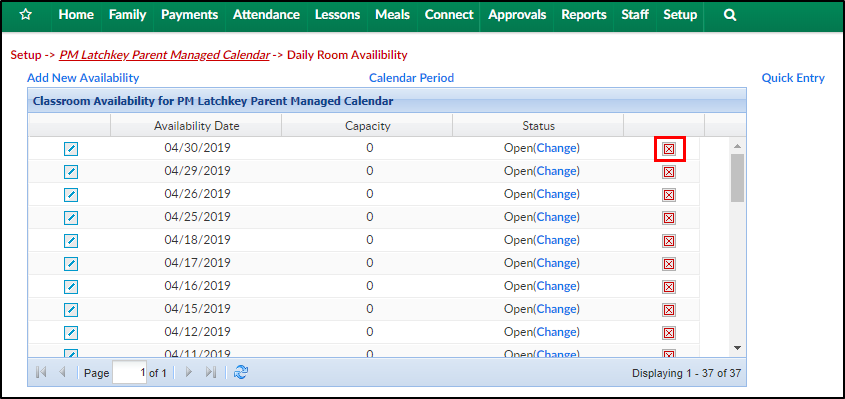
- To edit the information for a specific day, click the modify icon in the first column


Common Issues
Below are some common issues with Parent Managed Rooms/Calendars and troubleshooting steps/articles to assist with resolving them.
- The calendar is not appearing for parents to select days via Parent Portal or the wrong calendar is displaying
- Check that an admin has entered days into the Parent Managed Availability screen
- Ensure the student is registered into the Parent Managed Registration Room
- Verify the student is registered into the registration room for the correct center
- If a student will be attending multiple centers, they must have the registration room for each center
- A parent does not have access to a computer, how can an admin/staff member add days for a student?
- Not all the days are displaying on the calendar
- The calendar will only display days between the Enrollment start and end dates on the View Semester screen. For example: If the enrollment dates are 01/01/2019-05/31/2019 and 06/01/2019 is entered in the Parent Managed Availability screen, it will not appear on the calendar for the parent to select
- Parents are unsure how to select days from the Parent Portal