The Family Tab within the Family Record displays basic family information and allows administrators the ability to add reporting groups, track family status and basic settings.
Please Note: After updating anything on this screen, be sure to save before moving on!
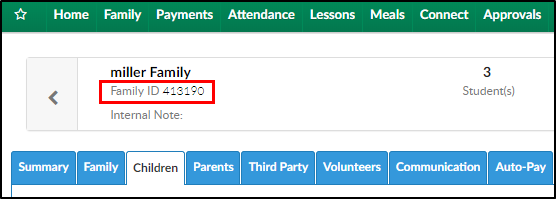
Family ID - the first line of the Family Tab displays the Family ID number. This is the system's unique ID for the family.
Actions Menu
Under the Actions menu, family accounts can be linked.
Linking family accounts allows parents to log into the Parent Portal with the one set of credentials and switch between separate families. The instructions below walk through how to link accounts from the Admin site. Parents can also link accounts from the Parent Portal - click here for instructions.
- Click Actions, then select Link Family Account

- Current linked accounts will display in the Linked Family Accounts section
- To add a new linked account complete the Link a New Account section. Please Note: these steps must be completed under both centers.
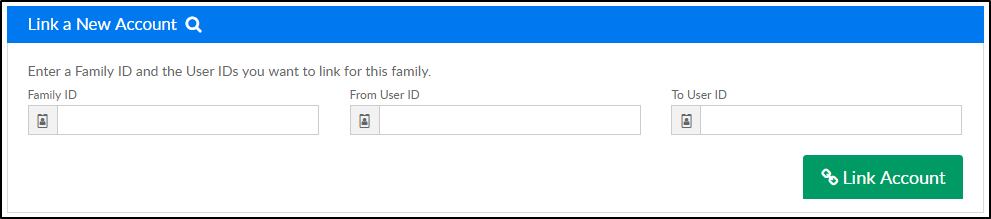
- Family ID – enter the Family ID of the other family (not the record currently displaying)
- From User ID – enter the parent portal username of the family currently displaying
- To User ID – enter the parent portal username of the family being linked to (the same family as the Family ID listed above)
- Family ID – enter the Family ID of the other family (not the record currently displaying)
- Click Link Account
- The linked account will now display in the Linked Family Accounts section

- When the parent logs into the Parent Portal, they have the option to switch between family accounts


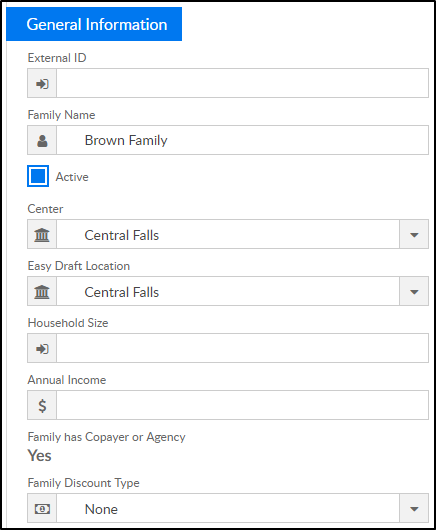
General Information
- External ID - this field will display if the center uses an SIS integration or imported family detail
- Family Name - the system will automatically create the family name using the last name of the student and "Family". This can be changed if the student and parents have a different last name
- Active - this box should be checked if the family is still active at the center. If the family is inactive, uncheck the box
- Center - select the family's home center. This should be the center the students typically attend
- Easy Draft Location - (Unity payment processing clients only) select which account funds should go to for payment processing
- Household Size - can be used of the site tracks the information for agency or CACFP purposes
- Annual Income - can be used of the site tracks the information for agency or CACFP purposes
- Family has Copayer or Agency
- Yes - the family is a split family and has a third party contract associated to one or more students
- No - the family is not a split family and does not have a contract
- Family Discount Type - used for tracking purposes. Please Note: this will not actually allocate a discount to the family (that is done on the child or parent tab) options are Employee or Family

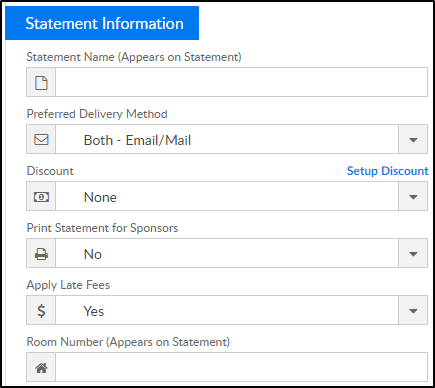
Statement Information
- Statement Name - enter the name to display on the family's financial ledger. If this text box is blank, the statement name will be defaulted to the Family Name
- Preferred Delivery Method
- Both - Email/Mail - the statement will be emailed and mailed
- Email - the statement will be delivered via email only
- Printed Mail - the statement will be delivered via mail only
- Discount - using this drop-down list to assign a corporate discount for a family is not recommended; the preferred discount method for a family is a corporate discount setup in the parent tab
- Print Statements for Sponsors - this field will display if third party sponsors will have a billing statement created for the student
- Yes - print a statement for the sponsor
- No - do not print a statement for the sponsor
- Apply Late Fees
- Yes - automatically assign late fees to the family as needed
- No - do not apply late fees to the family
- Room Number (Appears on Statement) - enter the room number associated to the student’s enrollment into the center

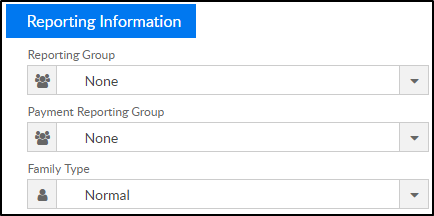
Reporting Information
- Reporting Group - select from the list to associate a family to a specific reporting group. Please Note: This is a group that can be associated to a discount
- Payment Reporting Group -
- Family Type -

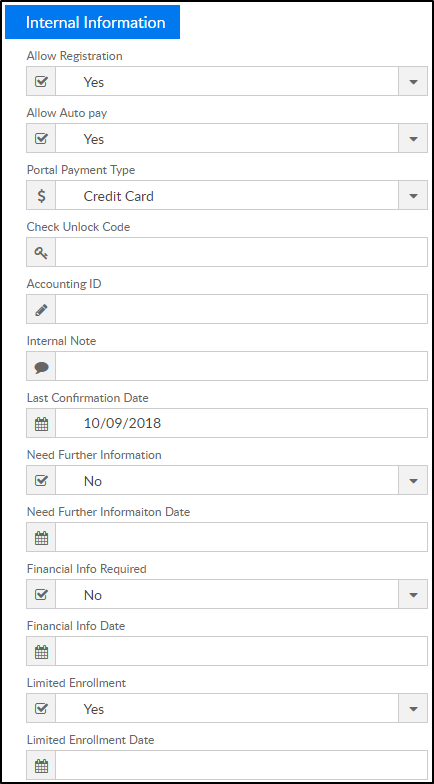
Internal Information
- Allow Registration
- Yes - the family is able to register for a classroom online through the Connect Portal
- No - the family is not able to register online via the connect portal
- Allow Auto Pay
- Yes - allow the family to setup auto pay
- No - the family is not allow to use auto pay
- Portal Payment Type - choose from the drop-down to indicate the method of payment available for the parents to make thought the Connect Portal. If anything other than Credit Card is selected, parents will be able to register for programs online without being required to make a payment
- Check Unlock Code - this field displays a code required by the parent to make a payment online with a check
- Accounting ID - this field displays the accounting identification number associated to the family
- Internal Note - enter any additional notes regarding the family in the Platform
- Last Confirmation Date - the date the family last updated their information online
- Need Further Information
- Yes - the family needs to provide more information
- No - the family does not need to provide any more information
- Need Further Information Date - select a date to indicate when further information is needed from the family
- Financial Info Required
- Yes - third party financial information is needed
- No - no financial information is needed
- Financial Info Date - this field indicates when the Financial Info Required section was created
- Limited Enrollment
- Yes - the family is waiting because of limited enrollment
- No - the family is not waiting
- Limited Enrollment Date - indicated when the limited enrollment section was created

When all information is complete, click Save at the bottom of the page.